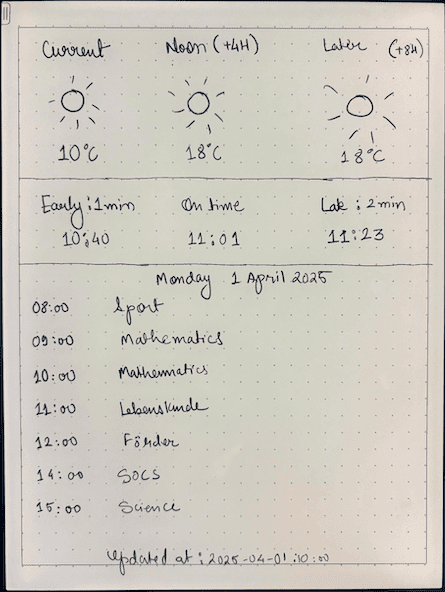
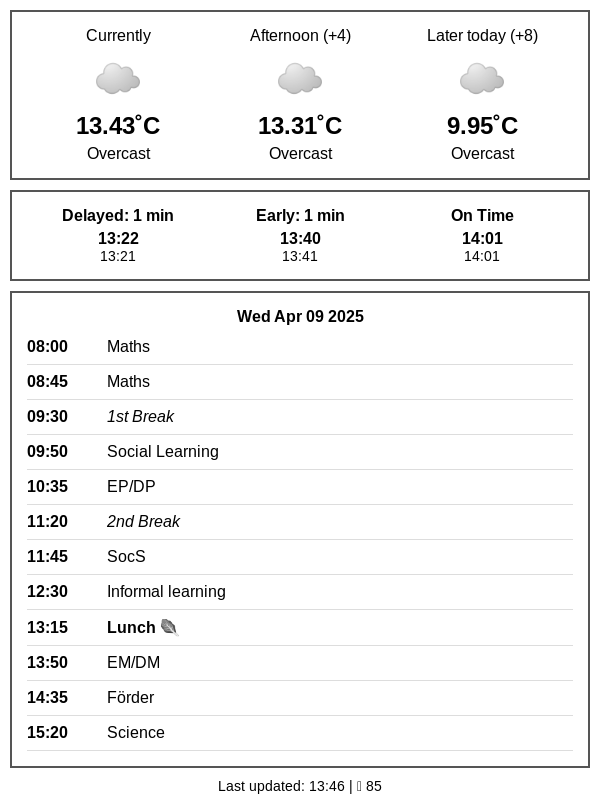
It’s School time! Adventures in hacking kindle
It was Monday and my daughter was late for the school again. To make things worse, the bus came early by 2 minutes. After rushing and making sure she caught the bus on time, I sat down for my morning coffee and opened up Hacker News. The front page had an interesting entry: “All Kindles can now be jailbroken”. Curiously my old kindle was lying next to me. Was this a sign from the universe? There was only one way to know and thus began my journey to turn my kindle into a get-ready-for-school dashboard.
Level 1: Jailbreaking the Kindle ⛓️💥
Jailbreaking the kindle was a relatively easy process. The fine folks at kindlemodding.org have created a user friendly guide with easy step by step instructions. The guide is very comprehensive and user friendly so it would be futile for me to repeat the steps here. The KindModding Discord community is also a great place to ask for troubleshooting.
In a nutshell the main steps I took to jailbreak my kindle were:
- Identify your kindle model.
- Install WinterBreak. (Just place the zip file in the kindle and reboot.)
- Setup a hotfix, i.e. make sure the jailbreak persists after updates.
- Install the Kindle Unified App Launcher and a package installer (MRPI)
- Enable SSH on the Kindle using USBNet package.
Network shenanigans ☎️
I hit my first roadblock while setting up SSH access for the kindle. The standard USBNet package did not work for my kindle and after some research I found USBNetLite which got the SSH working.
The USBNetlite package enables connection to the kindle using 2 modes:
- RNDIS/Ethernet gadget. This shows up as
usbx(usb0in my case) - SSH over network using the IP address assigned by the router. This shows up as
wlanx(wlan0in my case)
[root@kindle us]# ifconfig
lo        Link encap:Local Loopback
          inet addr:127.0.0.1  Mask:255.0.0.0
          ...

usb0      Link encap:Ethernet  HWaddr EE:19:00:00:00:00
          inet addr:192.168.15.244  Bcast:192.168.15.255  Mask:255.255.255.0
          ...

wlan0     Link encap:Ethernet  HWaddr 08:84:9D:7B:9C:F1
          inet addr:192.168.2.71  Bcast:192.168.2.255  Mask:255.255.255.0
          ...
To enable the SSH network I had to do the following steps:
- Enable USBNet from the KUAL Menu.
- Set the IP address manually to
192.168.15.201or any address in the192.168.15.xxxsubnet. - SSH using
ssh 192.168.15.244(usb0 ethernet interface) or thewlan0address assigned by the router. - Enter the password from the /etc/config file.
With this I had root access to the kindle 🥷
[root@kindle us]# uname -a
Linux kindle 4.1.15-lab126 #1 SMP PREEMPT Thu Nov 28 11:37:06 UTC 2024 armv7l GNU/Linux
Level 2: Conjuring a dashboard on the Kindle ✨
Kindle OS is stripped down version of Linux running an ancient kernel and old Gnu utilities but no package manager. The kindle has several custom tools that enable the Kindle UI operations, like the custom UI framework called framework and it’s side-kick lab126_gui. It’s workhorse is lipc, a dbus style program which is used to issue commands to drive the device operations.
There are several ways to develop an app for a hacked kindle. Some apps like KoReader use the FBInk framework1 and some use Java applets2. I chose the easy path: disable the framework, display a PNG image periodically in full screen mode3.
I modified the main dash.sh script from the OG repos to match my needs. As it happens with old unmaintained devices, neither xh nor wget worked for my kindle in the background mode. After some debugging, I finally switched back to plain ‘ol curl to fetch the PNG from the backend API.
The script runs in a loop based on a cron schedules:
- It stops the kindle UI frameworks and screensavers if they’re running.
- It checks if the internet is accessible.
- It fetches the PNG image from the server
- It displays it fullscreen on the kindle using the
eipscommand.
A Note about the image resolution: Kindle needs images in 8-bit Grayscale else it will not be displayed correctly. You will also need to find out the kindle’s display resolution using
eips -icommand. (Mine was 800x600)
I used a dummy image to test the kindle client before moving on to the backend side.
Level 3: The API server in the clouds 🌤️
I designed a backend API that collected the data in real-time data and exported it as a PNG image. For that I wanted a platform that’s always up, supports modern web standards, and has a pleasant developer experience. Cloudflare Developer Platform meets all the criteria and it was a breeze to get started.
I used the following tools/frameworks for my backend.
- Cloudflare Workers: The workhorse to process incoming requests and image processing.
- Hono JS: A Fast, lightweight JS framework.
- Cloudflare KV: To cache network requests for an hour
- Bun and TypeScript: I love Zig and Bun is really pleasant to work with.
Weather
I am a big fan of Merry Sky and the realtime weather API Pirate Weather API that powers it. After getting the API key, it was a matter of few hours to fine tune the data I needed to get current weather data. I loved that Cloudflare secrets make it very easy to store secrets that can be used easily in the code.
Public transport
I live in Berlin which has a robust public transport network so getting reliable public transport data was easy. I used the public API for VBB Berlin to get real time update about the Bus stop next door. Funnily enough, there was a strike when I worked on this part which helped me write code for this strange edge case.
// 🚧 Sometimes BVG is on strike so the API returns empty departures[] 🚧
if (Array.isArray(departuresData.departures) && departuresData.departures.length === 0) {
    console.log("No departures available.");
    return null;
}
School timetable
Designing school timetable was interesting due to interleaving breaks between the classes. I sat down with my daughter and we had fun designing the data structure behind it. Turns out I was over-engineering it and she simplified it by making it an Array of values. She had fun filling in the data including the weekends. As it changes once a year, I hardcoded the data but I like the possibility to share it in KV or D1 in the future.
Bringing it all together
With all the data in hand, I designed the dashboard UI with my daughter.

As a final missing piece I added a custom HTTP Header X-Battery-Level that will be sent by the kindle client.
app.get("/api/internal/dashboard", async (c) => {
  const weatherData = await getWeatherData(c);
  const departuresData = await getRouteData(c);
  const timeTable = await getTimetable(c);
  const battery_level = c.req.header("X-Battery-Level") ?? "-99";

  if (weatherData === null || departuresData === null || timeTable === null) {
    return new Response("Could not create dash HTML page", { status: 500 });
  }

  let data: DashboardData = {
    weatherData: weatherData,
    departuresData: departuresData,
    timeTable: timeTable,
    batteryLevel: battery_level,
  };

  const renderedHtml = renderHtml(data);
  return c.html(renderedHtml);
});
Image processing magic 🪄
With the HTML Dashboard in place, the challenge moved to the next level. To return a compatible image from the API I needed to:
- Render the webpage in the Worker
- Take a screenshot
- Convert the image from
sRGB 16 Colorto8-bit Gray scale.
Cloudflare Workers is a sandboxed environment and it has limited access to the tools like sharp. However Cloudflare and the developer community has provided viable alternatives in the form of Cloudflare Browser rendering, Puppeteer, and cf-wasm image processing tools. After experimenting with these tools I formulated the plan to return a rendered PNG to the kindle client in the desired format.
First step was to capture the screenshot using Cloudflare’s flavour of the Puppeteer library.
  // Use the same host as the current request
  const host = new URL(c.req.url).origin;
  let dashboardUrl = `${host}/api/internal/dashboard`;
  dashboardUrl = new URL(dashboardUrl).toString();

  const browser = await puppeteer.launch(c.env.MYBROWSER);

  const page = await browser.newPage();

  const battery_level = c.req.header("X-Battery-Level") ?? "-99";
  page.setExtraHTTPHeaders({ "X-Battery-Level": battery_level });

  await page.setViewport({
    width: DASHBOARD_WIDTH,
    height: DASHBOARD_HEIGHT,
  });

  await page.goto(dashboardUrl);

  const img = await page.screenshot({
    type: "png",
    clip: {
      x: 0,
      y: 0,
      width: DASHBOARD_WIDTH,
      height: DASHBOARD_HEIGHT,
    },
  });

  await browser.close();
With the clean screenshot in hand, the next step was to apply the image conversion. It had been few years since I dabbled into image processing algorithms, but after reading some manuals4-5 I figured out that I need to use the EncodeOptions of the cf-wasm library to encode the data into the correct format.
  try {
    const imageData = new Uint8Array(img);
    const decodedImage = decode(imageData);
    const { width, height, image: rawImage } = decodedImage;

    // grayscaleData stores image data, 1 channel per pixel
    const grayscaleData = new Uint8Array(width * height);

    // We need to convert the image now to grayscale
    for (let i = 0; i < rawImage.length; i += 4) {
      const r = rawImage[i];
      const g = rawImage[i + 1];
      const b = rawImage[i + 2];

      // We need to use Luminosity method for grayscale conversion
      // This is a weighted average of the RGB color channels to make the images legible to human eyes
      const gray = Math.round(0.299 * r + 0.587 * g + 0.114 * b);

      // The originial 4-channel data is from the 4-channel input: (width * height * 4)
      // We need to store only the grayscale value  from the single channel corresponding to width * height
      grayscaleData[i / 4] == gray;
    }

    // We now encode the image back to PNG format without alpha and 8-bit depth
    const outputPng = encode(grayscaleData, width, height, {
      color: ColorType.Grayscale,
      depth: BitDepth.Eight,
      stripAlpha: true,
    });

    // Return grayscale PNG
    return outputPng;
  } catch (error) {
    console.error("Grayscale conversion error:", error);
    return null;
  }
This returns the PNG image in the format supported by the Kindle and is displayed on it in it’s full glory. 🌟

Final thoughts
Hacking the kindle and making it work for the dashboard was fun! Cloudflare Developer platform has some interesting next-gen paradigms like Durable Objects, D1 and KV. The development experience was seamless and it didn’t break sweat when I tried to do things off the beaten path. Deployments are straight forward with the underlying open source technologies behind it.
The device has been chugging alone smoothly for a month now and I need to charge only once every 2 weeks. I plan to update the UX a bit which would be a fun exercise to do with my daughter. Her friends also loved the idea and I plan to conduct a workshop with them. After all, old unused kindles can be found on eBay for €20 and are a great hacking device.
Here’s to many more such hacking adventures! 🏴☠️
The code is available on my Github profile:
Kindle Dash Client
School dashboard backend
-
yes, even in 2025. Some technologies die hard: https://wiki.mobileread.com/wiki/Kindlet_Index ↩︎
-
This was inspired from PascalW’s kindle-dash project and the later additions made by Hemanth ↩︎
