Part 2: Configuring PostgreSQL, and defining the SQL entities
Configuring PostgreSQL, and defining the SQL entities
There are several ways to install PostgreSQL database, however the easiest way is through docker[^1]. We’ll use a docker-compose file to configure all the aspects of this project.
The Docker-compose file will eventually have 3 sections, each representing:
- PostgreSQL database
- PostgREST service
- Swagger OpenAPI service
The base docker-compose file looks like this:
version: '3'
services:
    db:
        # PostgreSQL database config
    server:
        # PostgREST service config
    swagger:
        # Swagger OpenAPI config
Configuring the database
The PostgreSQL database section of the docker-compose file looks like this:
version: '3'
services:
  db:
    image: postgres:alpine
    ports:
      - "5432:5432"
    expose:
      - "5432"
    environment:
      POSTGRES_DB: app_db
      POSTGRES_USER: app_user
      POSTGRES_PASSWORD: password
    volumes:
      - "./pgdata:/var/lib/postgresql/data"
      - "./scripts:/docker-entrypoint-initdb.d"
The image section specifies which postgreSQL image to use. We’ll use the lightweight alpine image for PostgreSQL server.
The ports and expose section expose and map port 5432 to localhost’s port# 5432.
The environment section describes the database, username and password of the instantiated PostgreSQL Database.
The volumes section consists of 2 parts:
- Since docker images are ephemeral, we need do tell Docker the location of the folder where persistent data is stored. This line effectively maps
./pgdatain current folder to/var/lib/postgresql/datainside the container. This is the location that the PostgreSQL will use to store data. - The initialization scripts used to bootstrap the PostgreSQL DB. The SQL script(s) from the local folder
.scriptswill be executed once the DB is started. We’ll take a look at these scripts in a moment.
Database entities
Let’s take a look at the scripts/init-db.sql SQL script that creates the necessary DB entities.
CREATE SCHEMA api;

SET search_path TO api;

drop table if exists api.amenity;
drop table if exists api.review;

-- Ratings enum instead of asking user to type in
create type rating as enum ('positive', 'neutral', 'negative');

create table api.amenity (
    amenity_id serial primary key,
    amenity_name text not null,
    amenity_address text not null,
    created_on timestamptz not null default now()
);

create table api.review (
    review_id serial primary key,
    review_rating rating,
    review_text text,
    created_on timestamptz not null default now(),
    amenity_id integer not null references api.amenity(amenity_id)
);

-- Create users

CREATE ROLE api_user nologin;
CREATE ROLE api_anon nologin;

CREATE ROLE authenticator WITH NOINHERIT LOGIN PASSWORD 'password';

GRANT api_user TO authenticator;
GRANT api_anon TO authenticator;

GRANT USAGE on SCHEMA api to api_anon;
GRANT SELECT on api.amenity to api_anon;
GRANT SELECT on api.review to api_anon;

GRANT ALL on schema api to api_user;
GRANT ALL on api.amenity to api_user;
GRANT ALL on api.review to api_user;

GRANT ALL PRIVILEGES ON ALL SEQUENCES IN SCHEMA api TO api_user;
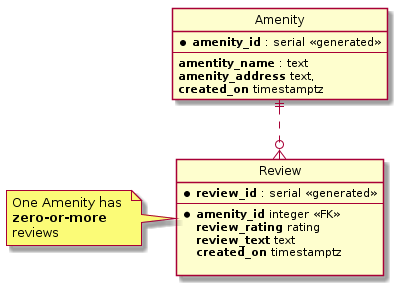
We begin by creating a schema api which will be exposed to the Postgrest service. We’ll create two tables amenity and review and there is a one-to-many mapping between amenity and review. We’ll also create an enum to handle ratings for an amenity. All these DB entities are created in the api SCHEMA.
The next section of the SQL script deals with user creation. PostgREST used the battle tested user system of PostgreSQL DB to provide layered API access. We’ll create three roles in the DB:
authenticator, which is created withNOINHERITand configured in the database to have very limited access. The PostgREST docs explain this in detail[^2].api_anon, which will havereadaccess but notwriteanddeleteaccess to the API.api_user, which will have read/write/update/delete rights on the SCHEMA and it’s tables. It’ll also have access to theSEQUENCESin theapiSCHEMA.
The Entity relationship diagram shows the schema in detail.
Testing the setup
With all these pices in place, it’s time to run and verify if the database setup is working as intended. The following command will start the database.
docker-compose up
The output here is abridged and shows only the relevant parts from the verbose output on the terminal.
↪ docker-compose up                                                                                                                                     Sat Feb 29 22:28:57 2020
Creating network "postgrest-demo_default" with the default driver
Creating postgrest-demo_db_1      ... done
Creating postgrest-demo_swagger_1 ... done
Creating postgrest-demo_server_1  ... done
Attaching to postgrest-demo_swagger_1, postgrest-demo_db_1, postgrest-demo_server_1
db_1       | The files belonging to this database system will be owned by user "postgres".
db_1       | This user must also own the server process.
db_1       |
db_1       | The database cluster will be initialized with locale "en_US.utf8".
db_1       | The default database encoding has accordingly been set to "UTF8".
db_1       | The default text search configuration will be set to "english".
db_1       |
db_1       | Data page checksums are disabled.
server_1   | Attempting to connect to the database...
server_1   | Listening on port 3000
#... output truncated
db_1       | running bootstrap script ... ok
#... output truncated
db_1       | CREATE DATABASE
db_1       | /usr/local/bin/docker-entrypoint.sh: running /docker-entrypoint-initdb.d/init-db.sql
db_1       | CREATE SCHEMA
#... output truncated
server_1   | Connection successful
The output shows that the database was created successfully, and bootstrapped with the SQL script. We’ll now test if things are working as expected using the psql command line tool.
psql -h localhost -p 5432 -U app_user -d app_db
After connecting successfully to the postgreSQL DB, let’s insert some data into the DB. We’ll read this data in the next step.
WITH amenity_1 AS (INSERT INTO api.amenity (amenity_name, amenity_address)
                   VALUES ('Brandenburger tor', 'Pariser Platz, 10117 Berlin')
                   RETURNING amenity_id)
    INSERT INTO api.review (review_rating, review_text, amenity_id)
    SELECT 'positive', 'top landmark', amenity_id
    FROM amenity_1
;
It can be seen in the image that the DB connection is successful, and the tables have been created.
↪ psql -h localhost -p 5432 -U app_user -d app_db

Password for user app_user:
psql (12.2)
Type "help" for help.

app_db=# WITH amenity_1 AS (INSERT INTO api.amenity (amenity_name, amenity_address)
app_db(#                    VALUES ('Brandenburger tor', 'Pariser Platz, 10117 Berlin')
app_db(#                    RETURNING amenity_id)
app_db-#     INSERT INTO api.review (review_rating, review_text, amenity_id)
app_db-#     SELECT 'positive', 'top landmark', amenity_id
app_db-#     FROM amenity_1
app_db-# ;
INSERT 0 1

app_db=# select * from api.amenity;

 amenity_id |   amenity_name    |       amenity_address       |          created_on
------------+-------------------+-----------------------------+----------------------------
          1 | Brandenburger tor | Pariser Platz, 10117 Berlin | 2020-03-19 11:24:26.959512+00
(1 row)

app_db=# select * from api.review;

 review_id | review_rating | review_text  |          created_on           | amenity_id
-----------+---------------+--------------+-------------------------------+------------
         1 | positive      | top landmark | 2020-03-19 11:24:26.959512+00 |          1
(1 row)