LooLocator: The ViewController
With the completion of the modular ViewModel, we can now proceed to put the final piece of the puzzle, the ViewController. In order to do that let’s start with the Single View App project we created in the first post. Here are the things we need to do:
- Rename the ViewController to
AmenityViewController. - Add a MapKit Mapview to the
Main.storyboardand change it to take all available space. - Create an
IBOutletconnecting theAmenityViewControllerto the Storyboard.
The AmenityViewController will need to instantiate a ViewModel and it’s dependencies. The dependencies graph for ViewModel look like this:
ViewModel
    |-- AmenityRequest
    |-- LocationProvidable
        |-- LocationManagerConfigurable
So the variable declarations can be written as:
private(set) lazy var locationManager: LocationManagerConfigurable = {
        let _clLocationManager = CLLocationManager()
        return _clLocationManager
    }()

private(set) lazy var amenityLocationProvider: LocationProvidable = {
        let _locationProvider = LocationProvider(locationManager: locationManager)
        return _locationProvider
    }()

private(set) lazy var amenityRequest: AmenityRequest = {
        let _amenityRequest = AmenityRequest()
        return _amenityRequest
    }()
we can now create the ViewModel after all it’s dependencies are defined
private(set) lazy var viewModel: MapViewModel<ViewController> = {
        let _viewModel = MapViewModel(locationProvider: amenityLocationProvider,
                                      amenityRequest: amenityRequest,
                                      listener: self)
        return _viewModel
    }()
The AmenityViewController has the following resposibilities:
- Center the
mapViewbased on the current location coordinates sent by the ViewModel
- Implement the
MapViewModelObservableprotocol, and handle the delegate methodsetCurrentLocation().
- Create a function
getAmeneties()to get the nearest amenities once we get the current location.
The function to center map to coordinates is simple and can be coded as:
func centerMapOnLocation(location: CLLocation) {
        let coordinateRegion = MKCoordinateRegionMakeWithDistance(location.coordinate,regionRadius,regionRadius)
        mapView.setRegion(coordinateRegion, animated: true)
    }
The method getAmenities() can be written as:
fileprivate func getAmenities() {
        viewModel.getAmenities(in: 1000, type: .Toilets) { (success, locations) in
            guard let locations = locations as? [Location] else {
                return
            }
            for location in locations {
                DispatchQueue.main.async { [weak self] in
                    self?.mapView.addAnnotation(location)
                }
            }
        }
    }
The extention to implement MapViewModelObservable can be written as:
extension ViewController: MapViewModelObservable{
    typealias Amenity = Location
    func addAmenityToMap(amenity: Location) { }
    func setCurrentLocation(latitude: Double, longitude: Double) {
        print("current latitude: \(latitude), longitude: \(longitude)")
        let currentLocation = CLLocation(latitude: CLLocationDegrees(latitude), longitude: CLLocationDegrees(longitude))
        centerMapOnLocation(location: currentLocation)
        getAmenities()
    }
}
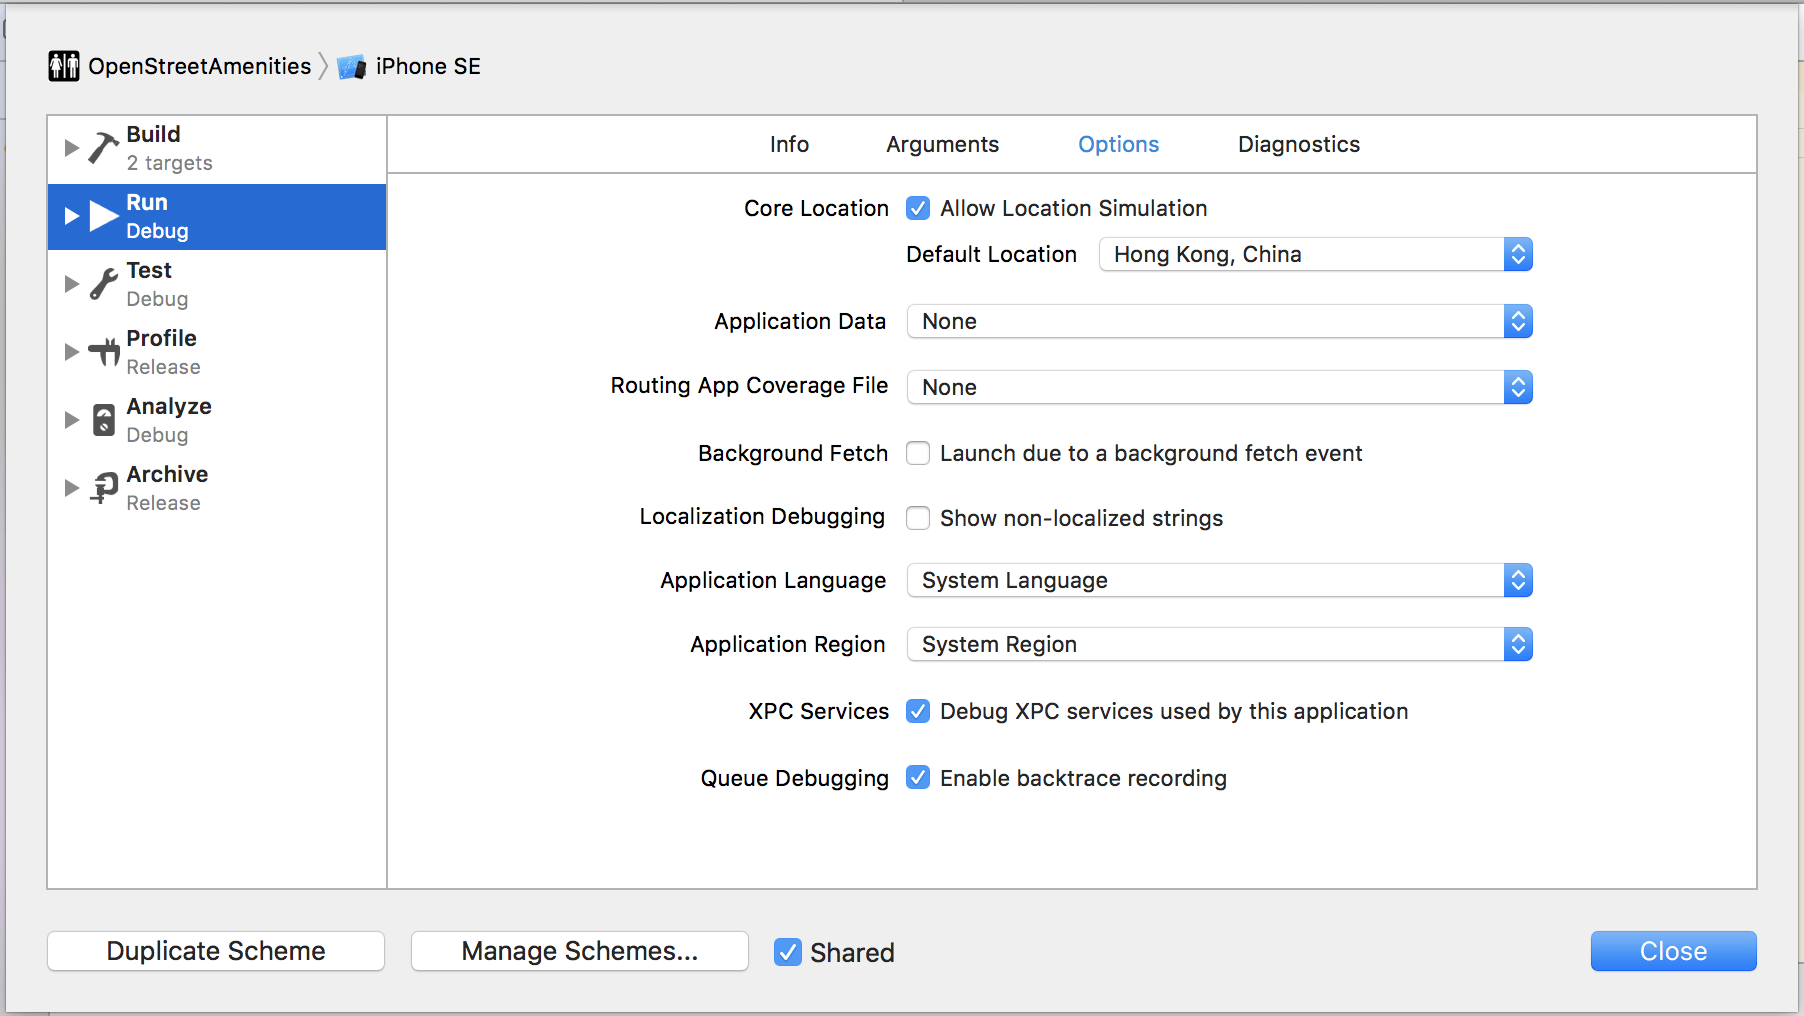
The App is now ready and can be run and tested. We need to enable the location simulation in the schemem if we want to test the app in simulator.
Adding Annotations Actions
The app loads the data and shows the amenities on the map, however clicking on it does nothing. The final thing we need to do before we leave is to add actions to the annotations. In order to do that we’ve to take the following steps.
- Extend
Locationdata class and implementMKAnnotationthat provides a customMKMapItem. - Extend
AmenityViewControllerand confirm it toMKMapViewDelegate. - Add the
MKMapViewDelegatemethods:mapView(_:viewFor:): To create a custom annotation viewmapView(_:annotationView:calloutAccessoryControlTapped:): To route to the location using the Maps app.
Extending MKAnnotation
Protocol MKAnnotation requires that we provide a method mapItem() that returns a MKMapItem. We also need to provide two properties coordinate, and subtitle which will be used by the Annotation.
The extension to Location data class that can be written as:
extension Location: MKAnnotation {
    var coordinate: CLLocationCoordinate2D {
        return CLLocationCoordinate2D(latitude: CLLocationDegrees(coordinates.0), longitude: CLLocationDegrees(coordinates.1))
    }
    var subtitle: String? {
        return "\(isAccessible ? "♿︎" : "")"
    }
    // Annotation right callout accessory opens this mapItem in Maps app
    func mapItem() -> MKMapItem {
        let addressDict = [CNPostalAddressStreetKey: title!]
        let mapCoordinates = CLLocationCoordinate2D(latitude: CLLocationDegrees(coordinates.0), longitude: CLLocationDegrees(coordinates.1))
        let placemark = MKPlacemark(coordinate: mapCoordinates, addressDictionary: addressDict)
        let mapItem = MKMapItem(placemark: placemark)
        mapItem.name = title
        return mapItem
    }
}
Extending AmenityViewController
Finally we need to implement the MKMapViewDelegate protocol.
extension ViewController: MKMapViewDelegate {
    func mapView(_ mapView: MKMapView, viewFor annotation: MKAnnotation) -> MKAnnotationView? {
        guard let annotation = annotation as? Location else {
            return nil
        }
        let identifier = "marker"
        var view: MKMarkerAnnotationView

        if let dequeuedView = mapView.dequeueReusableAnnotationView(withIdentifier: identifier)
            as? MKMarkerAnnotationView {
            dequeuedView.annotation = annotation
            view = dequeuedView
        } else {
            view = MKMarkerAnnotationView(annotation: annotation, reuseIdentifier: identifier)
            view.canShowCallout = true
            view.calloutOffset = CGPoint(x: -5, y: 5)
            view.rightCalloutAccessoryView = UIButton(type: .detailDisclosure)
        }
        return view
    }
    func mapView(_ mapView: MKMapView, annotationView view: MKAnnotationView,
                 calloutAccessoryControlTapped control: UIControl) {
        guard let location = view.annotation as? Location else {
            return
        }
        let launchOptions = [MKLaunchOptionsDirectionsModeKey: MKLaunchOptionsDirectionsModeWalking]
        location.mapItem().openInMaps(launchOptions: launchOptions)
    }
}
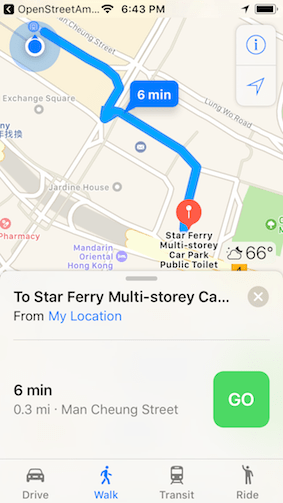
The openInMaps(launchOptions:) is the method of interest here. This method opens up the Map app, populates it with the information from the annotation, and provider route to the amenity.
Run the app and we’ll see that the annotations are now clickable. The Map app will open if we click the call out accessory, and show the route to the amenity.